Walk up to any hiker at a trailhead and ask them how much their backpack weighs. Most will confidently give you a number, often ending in a neat, even digit like “30 pounds.” However, if you were to put that same backpack on a digital hanging scale, the reality is almost always higher. Humans are notoriously bad at estimating physical weight, and hikers are prone to intense optimism regarding their gear.
The only way to truly understand what you are carrying—and more importantly, how to lighten that load—is to stop guessing and start measuring. This process guide will walk you through the meticulous, eye-opening experience of documenting your loadout and using digital tools to visualize your burden.

The Truth About Manufacturer Specs
Before opening a spreadsheet, you must understand the foundation of a gear audit.
Weighing backpacking gear is the process of measuring every individual item in your kit using a precise scale to determine its true mass. This comprehensive gear audit eliminates the guesswork of manufacturer specifications, allowing hikers to accurately calculate their base weight and identify unnecessary heavy items.
Many beginners simply look up the products they bought online and add up the “claimed weight” listed on the manufacturer’s website. This is a massive mistake. Manufacturer weights are often highly inaccurate. They frequently list the weight of a medium-sized item (if you wear an XL, it weighs more), and they often exclude the weight of stuff sacks, tags, guy lines, and included repair kits.
Grams vs. Ounces: Which is Better?
When deciding between grams vs ounces for your measurements, grams are vastly superior for ultralight hikers. A gram is a much smaller unit of measurement than an ounce (1 ounce = 28.35 grams). Using grams provides a higher level of granularity, making it much easier to track the progress of shaving weight when you perform micro-adjustments, like cutting the excess nylon straps off your backpack.
How to Conduct a Gear Audit
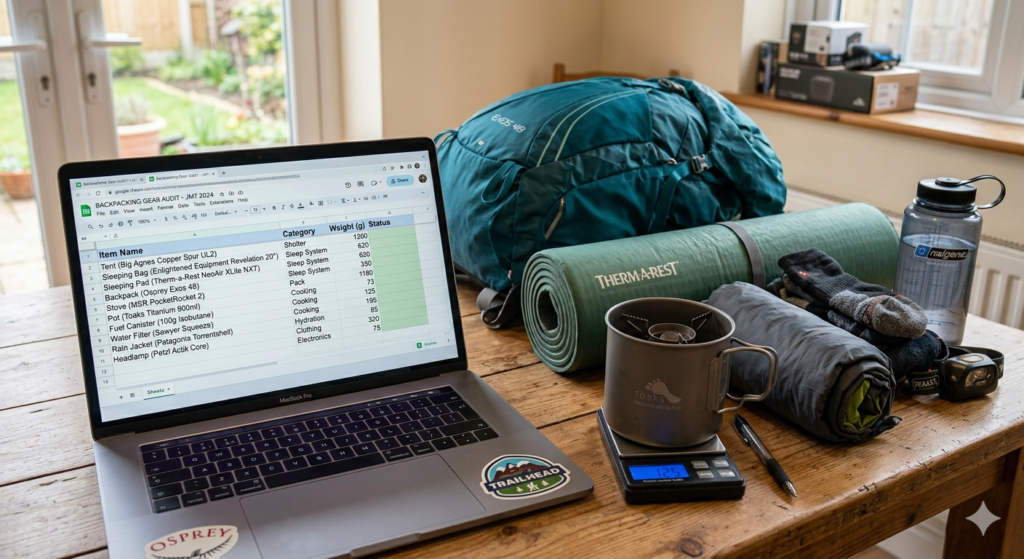
To begin your audit, you need to pull every single piece of hiking gear you own out of your closet.
You must use a reliable kitchen scale that measures in grams to get an accurate baseline. Place every item onto the scale individually. Do not weigh your tent in its stuff sack with the stakes inside; weigh the tent body, the rainfly, the poles, the stakes, and the stuff sack all as separate line items.
When you start weighing items, you’ll quickly see why Mastering Base Weight: The “Big 3” Explained is so critical. Your shelter, sleep system, and backpack will immediately dominate the scale, highlighting exactly where your weight reduction efforts should be focused.
Enter LighterPack: The Standard Gear List Software
Once you have your raw data, you need a way to organize it. While a standard Excel spreadsheet works, the outdoor community has universally adopted dedicated gear list software. The most prominent and free tool available is LighterPack.
LighterPack allows you to input your items, assign their weights, and categorize them (e.g., Shelter, Sleep, Kitchen, Clothing, Consumables). The software automatically calculates your Base Weight, Worn Weight, and Consumable Weight, separating them cleanly so you understand your true physical burden.
Analyzing the Pie Chart
The greatest feature of LighterPack is the visual pie chart it generates. This chart breaks down your base weight by category. If you look at the chart and see that the “Miscellaneous” category (first aid, electronics, toiletries) takes up 25% of your total pack weight, you instantly know you have packed too many fears and luxury items. Visualizing the data makes the abstract concept of weight undeniably concrete.
The Psychological Benefit of Shaving Weight
Inputting your gear into a database does more than just organize your trip; it gamifies the packing process.
Seeing your base weight drop from 18.5 lbs to 14.2 lbs after swapping out a tent and removing a heavy camp chair triggers a rewarding sense of accomplishment. It shifts the hiker’s mindset from “What else might I need?” to “What else can I safely remove?” This psychological shift is the true secret to successfully shaving weight and keeping it off over the long term.
Conclusion
The journey to a lighter backpack begins with honest data. Weighing backpacking gear is the mandatory first step for anyone serious about improving their comfort and endurance on the trail. By meticulously conducting a gear audit and leveraging visual tools like LighterPack, you transform your packing strategy from a guessing game into a precise, calculated science.
Frequently Asked Questions (FAQ)
1. Do I really need to weigh small items like ziplock bags?
Yes, at least initially. The philosophy of ultralight hiking is that “ounces equal pounds.” If you ignore the weight of five stuff sacks, a heavy ziplock bag, and an oversized tube of toothpaste, you might easily hide a full pound of weight from your calculations.
2. Is LighterPack the only gear list software available?
No, there are other alternatives like Packfire or Trailpost, and many hikers simply use Google Sheets. However, LighterPack is the most widely recognized platform and allows you to easily share your list via a simple URL to forums for “shakedown” advice.
3. Should I weigh the clothes I plan to wear while hiking?
Yes. Even though worn clothing is generally categorized as “Worn Weight” and not included in your “Base Weight,” you still have to carry it up the mountain. Weighing your clothing helps you choose lighter, more breathable fabrics.
4. How accurate does my scale need to be?
A standard digital kitchen scale that measures to the nearest single gram (or 0.1 ounce) is perfectly adequate for a gear audit. You do not need a highly sensitive jeweler’s scale unless you are measuring chemical water treatments or medications.
5. How often should I update my gear list?
You should update your list whenever you purchase a new piece of gear, or after a trip if you decide to permanently remove an item you didn’t use. Many hikers create different lists for different seasons (e.g., a Summer List and a Winter List) to keep their data accurate year-round.