Transitioning to a frameless backpack is a significant milestone for any hiker. It signifies that your base weight has dropped low enough that you no longer need heavy aluminum stays or rigid plastic frames to support your load. However, simply throwing your gear into a frameless sack will almost certainly lead to a painful day on the trail.
Understanding how to pack an ultralight backpack is a learned skill. Without an internal skeleton to hold the bag’s shape, your gear itself must provide the structure. This guide covers the essential techniques to distribute weight correctly, prevent sagging, and ensure maximum comfort over long distances.
The Core Concept: Creating Structure
Without rigid metal stays, a frameless pack is essentially a fabric tube. If packed incorrectly, it will collapse into a barrel shape, pulling away from your shoulders and digging into your lower back.
Packing an ultralight backpack without a rigid frame requires creating structure using your own gear. By utilizing a sleeping pad as a virtual frame and carefully managing weight distribution, you give the bag rigidity, preventing items from shifting or digging into your back.
The goal is to build a solid, rectangular column that transfers weight evenly across your torso and hips.
Building the “Virtual Frame”
The first step in frameless pack packing is establishing a barrier between your back and the lumpy gear inside your pack.
The most common and effective method is creating a “virtual frame” using your sleep insulation. You can slide a closed-cell foam sleeping pad against the back panel of the backpack. Many ultralight packs feature two elastic shock cords specifically designed to hold a folded foam pad on the outside against your back.
Alternatively, if you use an inflatable pad, you can slightly inflate it (just enough to give it shape) and place it flat against the internal back panel before packing the rest of your gear. This provides rigidity and a comfortable cushion.
The Strategy of Weight Distribution
Once the back panel has structure, you must manage the center of gravity. Proper weight distribution prevents the pack from swaying or pulling you backward.
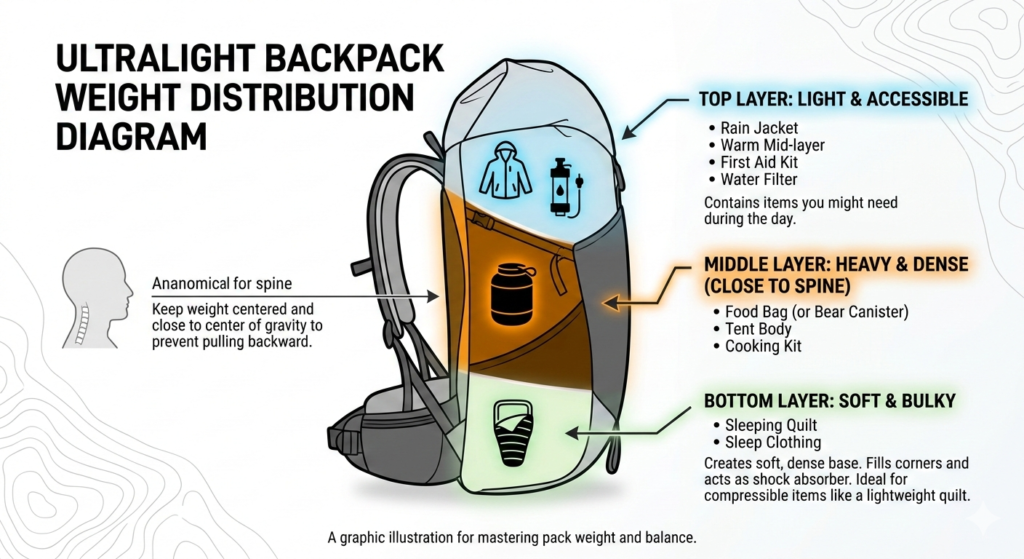
The Bottom Layer: Soft and Bulky
Start by placing a large, waterproof pack liner bag inside the backpack. Stuff your sleeping quilt and sleep clothing into the very bottom of this liner. This creates a soft, dense base that fills the corners of the pack and acts as a shock absorber for the heavier items above it. As discussed in our guide on “Mastering Base Weight: The “Big 3” Explained“, a lightweight, highly compressible quilt is ideal for this foundation.
The Middle Layer: Heavy and Dense
The heaviest items must be placed in the middle of the pack, as close to your spine as possible. This is where your food bag (or bear canister), tent body, and cooking kit should go. Keeping the weight centered and close to your center of gravity prevents the pack from feeling like it is pulling you backward.
The Top Layer: Light and Accessible
The top of the main compartment should contain items you might need during the day. This includes your rain jacket, a warm mid-layer, your first aid kit, and your water filter.
Filling the Voids (Ditch the Stuff Sacks)
A common mistake beginners make is keeping every piece of gear in its own tight, cylindrical stuff sack. In a frameless pack, hard cylinders do not stack well together. They create empty air gaps and push against each other, causing the pack to bulge into an uncomfortable barrel shape.
Instead, pack items loosely whenever possible. Let your tent body (if dry) fill the gaps around your food bag. Stuff your extra clothing into the crevices to stabilize the heavier items. This interlocking method turns a collection of loose objects into a single, cohesive unit.
Utilizing Outside Pockets
Ultralight packs heavily rely on exterior storage to keep the main compartment streamlined. The large front mesh pocket is designed for items that are wet, dirty, or needed quickly.
Store your wet tent fly in the outside mesh so it doesn’t soak your dry gear inside. Use the side pockets for water bottles, ensuring they are positioned low and symmetrically to maintain lateral balance.
Conclusion
Learning exactly how to pack an ultralight backpack takes a few practice runs. Every piece of gear fits differently, and you will quickly learn which packing order feels best against your spine. By ditching stuff sacks, centralizing your heavy items, and utilizing a folding sleeping pad for structure, you can carry your lightweight kit with zero discomfort, fully realizing the benefits of a frameless system.
Frequently Asked Questions (FAQ)
1. What happens if my pack rounds out like a barrel?
“Barreling” happens when gear is packed too tightly or too many rigid stuff sacks are used. Take everything out, remove the stuff sacks, and repack the items loosely so they contour to the shape of the bag rather than pushing outward.
2. Can I carry a bear canister in a frameless pack?
Yes, but it requires careful padding. Place the canister vertically in the center of the pack, as close to your spine as possible. Use your extra clothing and tent to pad the space between the rigid plastic canister and your back panel so it doesn’t dig into your spine.
3. What is the maximum weight for a frameless pack?
Most frameless backpacks are rated for a maximum total weight (gear + food + water) of 20 to 25 pounds (9–11 kg). Exceeding this limit will cause the pack structure to collapse, placing all the weight directly onto your shoulders.
4. Do I need a pack liner if my pack is made of waterproof material?
Yes. Even if the fabric (like Dyneema or Ultra) is highly water-resistant, the seams can still leak under heavy rain. A single, large plastic pack liner (like a trash compactor bag) inside the main compartment is the lightest and most reliable way to ensure your sleeping bag stays dry.
5. How tight should the compression straps be?
Tighten the side compression straps only after the pack is fully loaded. They should be snug enough to prevent the gear from shifting while you walk, but not so tight that they cause the pack to deform or squeeze items upward.